This week adding the skull, lips and eyes proved a tough challenge causing me to not be able to do more then I wanted. I would of liked to have done the ears and textured the face with a skin tone.
To start off with I encounter problems with doing the skull because I had the edge of my face shaped badly. This caused aligning the skull to the head to go badly wrong with a lot of dents and drooping skin in places making the face look very unreal although if my aim was to make the face look old then it may have some use. Even with a turbo smooth modifier
With the skull the neck also seems to point backwards as well as a hole that appeared with I was using the symmetry modifier and I was unable to correct because if I moved it or decreased the threshold then the forehead would go into a point or cross over through itself.
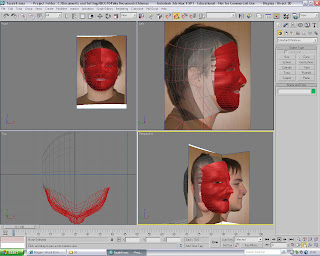
The eyes were simple yet were tricky to place. The eyes had to fill the sockets in each view to be effective and a simple sphere would not work. I took a sphere and stretched it until it was bigger then the socket and then tried to align it into the socket as well as rotating it so that it did not blotch out of one side of the eye. This had to be done twice because using a mirror or symmetry modifier would not put the eye in the right position.


To start off with I encounter problems with doing the skull because I had the edge of my face shaped badly. This caused aligning the skull to the head to go badly wrong with a lot of dents and drooping skin in places making the face look very unreal although if my aim was to make the face look old then it may have some use. Even with a turbo smooth modifier
With the skull the neck also seems to point backwards as well as a hole that appeared with I was using the symmetry modifier and I was unable to correct because if I moved it or decreased the threshold then the forehead would go into a point or cross over through itself.

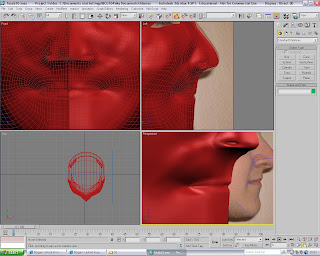
The lips I found easy once I knew what to do for them. Using the create tool to place vertex's and using the create tool with poly to make the surface the lips could be added to the rest of the face. I think they came off well although they may be a bit small in context with the entire face. The ridges needed into the lips could be softened since they seem quite deep but that could also appear on a normal face.
The lips have somehow managed to form a smile although during the mapping it was unintended, I think this happened because of the way I had done the curves in the face causing the lip edge to be raised slightly.
The lips have somehow managed to form a smile although during the mapping it was unintended, I think this happened because of the way I had done the curves in the face causing the lip edge to be raised slightly.

The eyes were simple yet were tricky to place. The eyes had to fill the sockets in each view to be effective and a simple sphere would not work. I took a sphere and stretched it until it was bigger then the socket and then tried to align it into the socket as well as rotating it so that it did not blotch out of one side of the eye. This had to be done twice because using a mirror or symmetry modifier would not put the eye in the right position.

While doing the eyes I decided to change the general colour of the face to a more fleshy tone and added a simple texture to the eyes just to give them some appearance.
Overall I have found this work to be good but found that there can be a lot of bits that go wrong with constructing it. I had a lot of difficulty with doing the topology and building the quads and because of it has to redo the face from scratch several times so that the face would fit and resemble a face. I am unhappy in some aspects on how the face turned out and that I ran out of time to add bits to it to make it look better. I think that more time was needed on the work so that it could of looked fuller and more complete as well as being able to hopefully iron out any of the dents and that with cause the face to look unnatural and disfigured.


